File Types and Categories
AssetWise Inspections allows users to attach files to assets, inspection reports, and even specific fields within inspection reports. The file types and categories configurations determine how those attachments are categorized and organized within the system.
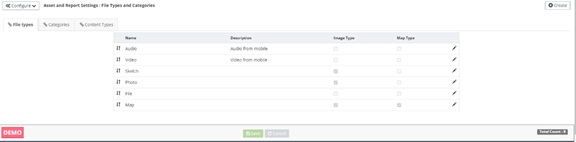
File Types Tab
File types are meant to indicate the type of file being uploaded so
that the file can be organized properly.
- Example: If when uploading a file the selected file type is "Audio" but the file chosen to upload is an image file, AssetWise Inspections will not deny the upload. The uploaded image will simply be organized in the audio category.
To edit an existing file type, click the
 symbol for the desired file type.
The process will be very similar to creating a new file type as described
below.
symbol for the desired file type.
The process will be very similar to creating a new file type as described
below.
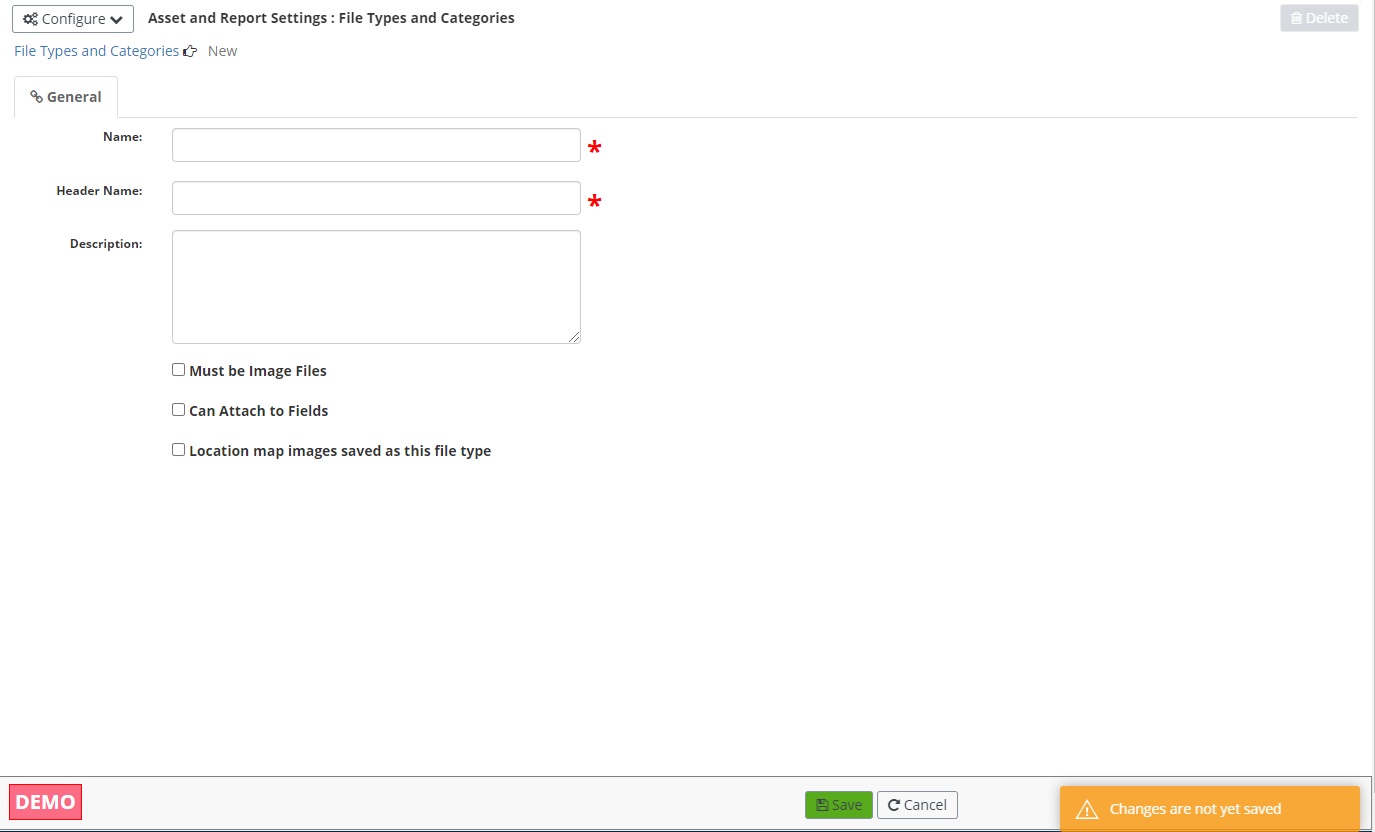
- Create New File Type - To create a new file type, click the Create button in the top right corner of the screen. The user will be taken to a new page to enter information about the new file type:
- General Tab Name - The Name textbox is a mandatory field, as denoted by the *. It is used to name the file type and should be indicative of the type's intended purpose. The name is what appears as a selection in the File Type dropdown on the Attach Picture/File form of an inspection report.
- Header Name - The Header Name textbox is a mandatory field, as denoted by the *. It is used to indicate the name of the categorical header used to organize the file types on the Attach Picture/File form of an inspection report:
- Must be Image Files - If checked, the Must be Image Files checkbox indicates that a file uploaded with the current file type selected must be an image file.
- Can Attach to Fields - If checked, the Can Attach to Fields checkbox indicates that this file type can be attached to specific fields within an inspection report. If it is not checked, this file type can only be attached to an asset or inspection report as a whole.
- Location map images saved as this file type - If checked, the Location map images saved as this file type checkbox indicates that this file type will be used for saved map images.
- Save and Cancel - The Save and Cancel buttons are located at the bottom center of the screen. The Save button saves the changes made to the file type.
- Delete - Once the file type is saved, the Delete button becomes available in the top right corner of the screen. Click Delete to delete the currently selected file type.
- Categories Tab - The Categories tab allows the admin to check the box of any of the categories that can be used to classify the files of the currently selected file type.
Categories Tab
The Categories tab allows the admin to create and manage categories. Categories indicate the classifications of specific file types.
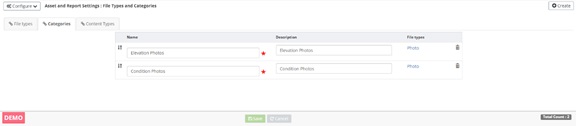
- Create New Category - To create a new category, click the Create button in the top right corner of the screen. A new, blank category will appear in the list.
- Name - The Name textbox is a mandatory field, as denoted by the *. The name should be indicative of the category's intended purpose.
- File Types - All file types that allow for the category as a classification will show up in the File Types column. Clicking on a file type's link will direct the admin to that file type's edit page.
- Delete - Click the
 symbol to delete the category.
- Save and Cancel - The Save and Cancel buttons are located at the bottom center of the screen.
Content Types Tab
The Content Types tab allows the admin to further configure system generated images and files collected on mobile.
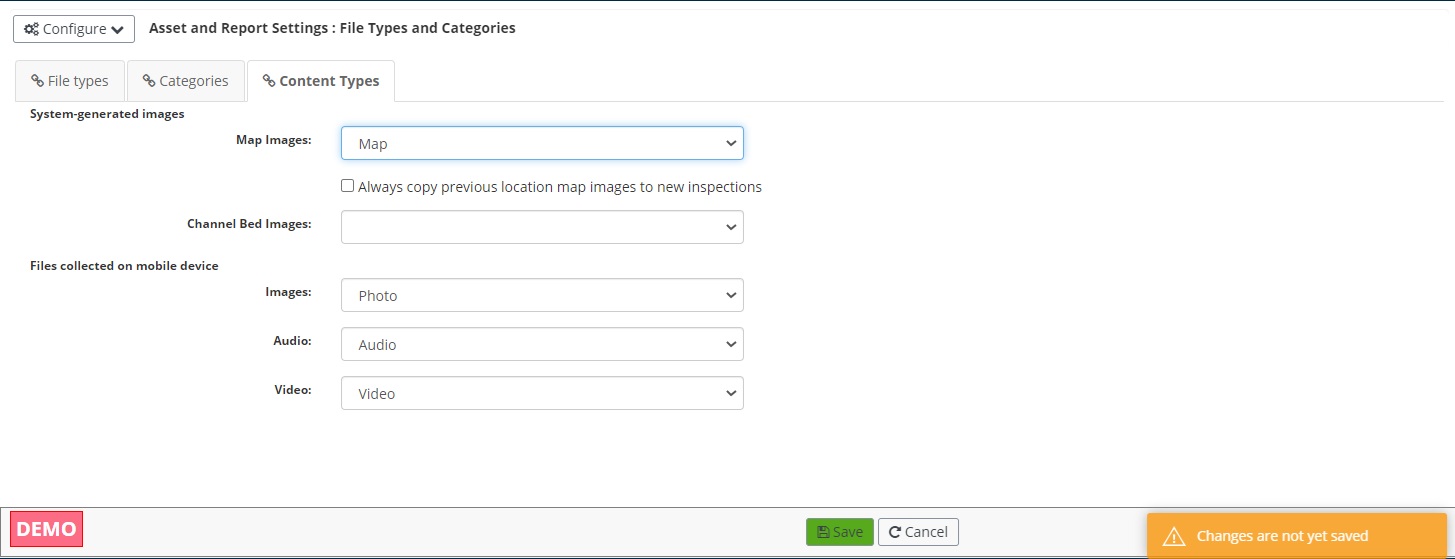
- Content Types Tab Map Images - The Map Images dropdown shows which file type is configured to save map images. This is the same as the Location map images saved as this file type checkbox on the create new file type.
- Always copy previous location map images to new inspections - The Always copy previous location map images to new inspections checkbox will default to checked or unchecked based upon which file type is selected in the prior step. This is the same as the Always copy previous location map images to new inspections checkbox on the create new file type.
- Channel Bed Images - The Channel Bed Images dropdown allows the admin to select which file types marked as an image type will be configured for Channel Bed images in the system.
- Files collected on mobile device - The Files collected on mobile device dropdowns allows the admin to determine which file type that images, audio, and video uploaded from the mobile collector are categorized.
- Save and Cancel - The Save and Cancel buttons are located at the bottom center of the screen. The Save button saves the changes made to the category.