To Place a Table from an Excel Workbook
-
Select the
Place Table tool ().

-
In the
Place Table tool settings window, select
From file.

-
Select the
Browse icon next to the
File Name setting.
The File Open dialog opens.
-
In the
File Open dialog, navigate to the
folder where your excel file is located, select the file and click
Open.
The Select Cells dialog opens.
- (Optional)
In the
Worksheet drop-down list, select the desired
worksheet.
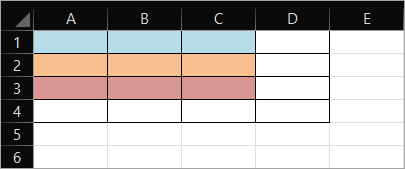
The range of cells defined for the selected worksheet are displayed in the From and To fields.
- (Optional)
By default, the
Range drop-down list is set to
Automatic, which means, the range of cells is
selected automatically. Refer to the image below.
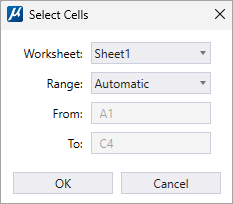
If you want to change the range of cells, select Manual from the Range drop-down list and then enter the cell range in the From and To fields. Refer to the image below.
- Click OK.
- (Optional) To preserve the formatting from the Excel file, select From Excel in the Seed drop-down list.
- (Optional) To add a title row and/or header row to the table, turn on the Contains Title Row and Contains Header Row check boxes respectively.
- (Optional) To retain association with the source Excel file, turn on the Retain Association check box.
- Enter a data point to place the table.
Note:
- Placing the table from an Excel workbook supports the formatting of the table, color scheme, and font scheme of MS Office 2007-10 only.
- If the formatted empty table is placed from an Excel workbook, then only the first cell of the table (and not the entire empty table) is placed in the DGN.
- If the data in the table from an Excel workbook is not completely filled, then the table placed in the DGN shows the range of cells only up to the last cell with data.
- Placing of pivot table(s) from an Excel Workbook is not supported in the DGN.