Vue Rendering Dialog
 Used to render a view using the
VUE rendering engine.
Used to render a view using the
VUE rendering engine.

The Vue Render application is modeless and coexists with the standard application view windows. Since the Vue rendering process is multi-threaded, which means that once the preprocessing stage of a rendering is completed, you can continue to work while the rendering process is in progress.
| Setting | Description |
|---|---|
| Render | Starts the rendering process to render a new solution of a selected view. |
| Cancel Render | (Enabled only when a rendering is in progress) Aborts the current rendering. |
| Fast Preview | Gives a fast preview of the rendering as per the settings in Preview section of Preferences Dialog, Render Category. |
| View | Allows you to select the view that want to render. Default is the active view. |
| Tracing | Allows you to select the tracing method. Options are, Ray Tracing and Path Tracing. |
| Render Image Size | Controls the size of the rendering. If locked, X and Y will be constrained to a fixed aspect ratio. |
| Select a light setup to render with | Opens the Light Manager dialog, used to control light setups and the settings for both global and source lighting. |
| Select an atmosphere setup to render with | You can select a predefined atmosphere setup from the drop-down menu. You can open the Atmosphere Editor dialog to edit Atmosphere settings. |
| Select a render setup to render with | You can select a predefined render setup from the drop-down menu. |
| Relighting | If on, enables relighting. You can fine tune the lighting in your scene without having to re-render it. You can adjust relighting settings in the Post Render panel under the Relighting tab. |
| NPR | If on, enables non-photorealistic rendering. You can adjust NPR settings in the Post Render panel under the NPR tab. |
| Brightness | (Tone Mapping Mode set to Brightness Adaptation, Brightness Multiplier) Controls the brightness for the rendering, in combination with the Brightness Adaptation/Brightness Multiplier toggle. You can type values directly or use the slider. The allowable range depends on the selected mode: |
| Contrast | (Tone Mapping Mode set to Brightness Adaptation,
Brightness Multiplier, Reinhard) Controls the overall image contrast for the
rendering.
You can type values directly, or use the slider. When set to Brightness Adaptation or Brightness Multiplier, the allowable contrast range is -2 to 2. When set to Reinhard, the allowable range is 0.3 to 1.0. If set to 0, the contrast is calculated automatically. |
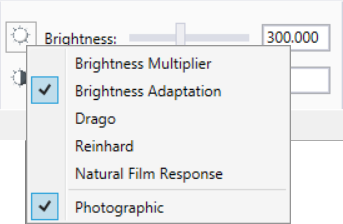
| Pop-up Menu to select Tone Mapping Mode |
Clicking the icon in the Brightness section opens a pop-up
menu with following tone mapping modes and settings:
As long as an image is displayed in the Vue Rendering dialog, the tone mapping modes synchronize with each other. |
| Exposure | (Tone Mapping Mode set to Drago) Exposure value field and slider allows you to adjust the brightness of the output image to your displaying conditions, in the range of [-8, 8]. The default value (0) means that no correction is applied. Higher values make the image lighter whereas lower values make the image darker. |
| Intensity | (Tone Mapping Mode set to Reinhard) The Intensity value and slider, in the range [-8, 8], controls the overall image intensity. The default value 0 means no correction. Higher values make the image lighter whereas lower values make the image darker. |
| Save Image |
Opens the Create Vue File dialog, which lets you save the
current rendering to an image file.
Controls on
this dialog are identical to those on the Save As dialog.
The standard image formats are available as well as "Radiance High Dynamic Range" (HDR). The HDR format stores high-definition imagery that you can post process in other applications. |
| Zoom | Opens the Zoom drop-down menu, where you can set a custom percentage or select preset values for the magnification of the image. Alternatively, you can use the mouse wheel on the Preview Window. |
| Pan | Allows you to pan through the preview. |
| Preview Window | Displays the rendering. |
| History | (Enabled only when a previous rendered image is available) Clicking the icon lets you view the previously rendered image. Clicking the down-arrow previews the previous history images. You can use the Preferences Dialog, Render Category to set the number of history images stored (default 100). |