Part Number Assignment Dialog
This dialog lets you make settings that determine how information is displayed in the drawing.
Accessed when:
- You click one of the following options in the Panduit Wire Containment dialog:
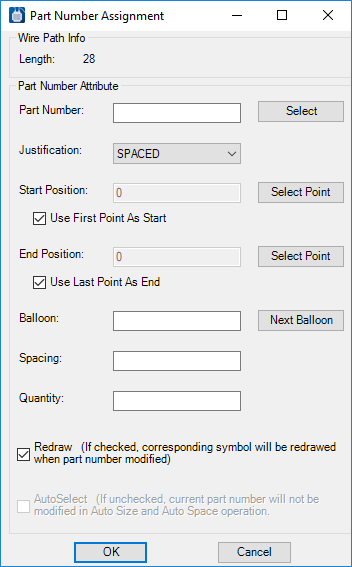
| Setting | Description |
|---|---|
| Part Number | To enter a part number, click on the
Select button next to the field. What
happens next depends on which of the options above was used to open the Part
Number Assignment dialog.
|
| Justification |
Determines where the part number will be drawn on the wire path.
|
| Start/End Position | The wire path is the center line for the wire bundle. Frequently, the end point of the wire path will land within or beyond the actual wire ducts that may intersect. The start and end position values allow the user to specify that the hardware should start or end at an offset from the wire path. The user can enter numbers to offset either end, or the user can use the Select Point button and pick a point with the mouse. Selecting the Use First Point as Start or the Use Last Point as End check boxes will align the hardware with the endpoints of the wire path. |
| Balloon | Associates a balloon number to the part if required. Select the Next Balloon button to insert the next unused balloon number. |
| Spacing | Enter a distance value to define a spacing interval for spaced type components. |
| Quantity | Assigns a quantity if more than one of the selected part number is being assigned to the wire path. |
| Redraw | Used with the auto-size/auto-space function. Not checking this option will result in the graphics not being updated when components are automatically re-sized or re-spaced based on wire fill. |
| AutoSelect | Allows parts to be automatically changed or the quantity to be changed in the auto-size/auto-space function. |

