Report Editor
The Editor
As with some other PlantWise dialogs, the Report Editor has some areas highlighted to indicate a special pop up menu for those specific regions. A right mouse click over the highlighted area opens the pop up menu.
When editing an existing report, the editor opens with all the fields filled in with that report’s current information. For new reports, the editor opens empty.

The following sections discuss the creation and editing of the report. The output of this report is as shown in following section..
Report Menus
The Report Editor has two menus – Report and Display.
Report Name Field
This field is where you enter the report name. This name is used as the file name, with an .rpt extension, for the report in the \reports subdirectory of the current project. The name should be a contiguous string of alphanumeric characters without spaces or other Invalid Characters. After the report has been Accepted, the name is added to the Report Writer list for future use or edits.
Report Parameters
| Setting | Description |
|---|---|
| Show Title | The check box when selected, the title entered in the Report Title field is displayed in the report output. When not selected, the Report Title field is disabled. For data export, the title is usually not included. |
| Show Headers | The check box when selected, the column headers or labels are displayed in the report output. For data export, the title is usually not included. |
| Output in XML | The check box when selected, generates the report output in XML format. The PlantWise XML reporting is as discussed in Standard XML Reports. |
| Show Separator Characters | The check box should always be selected. For data
export, a separator such as a comma, space, or a tab is commonly used between
each data item.
The separator to be used is selected from the drop down menu. The available standard separators are: space, tab, comma ( , ), comma-space (,space), bar ( | ), and asterisk ( * ). In addition, you may add extra separators by typing the desired character(s) in the drop down input field. |
| Title | The Report titles (which can be more specific than
the report name) are entered in this multi-line input field.
Variables that can be added to the report’s title
are: the date of when the report was run, the model name, project main units,
project master units, and project diameter units. This is information added to
a report titles from the pop up menu opened by a right mouse click in the
Report Title field.
In the sample report being used as an example for
this chapter, the following is the Report Title entered:
<date>
Pipeline information for condensers
And displays the date and time for when the report was generated followed by Pipeline information for condensers at the top of the report. |
| Comments | User comments regarding the report may be entered into this multi-line input field. The comments are readable only in the editor. |

Component Specification
This pane allows you to define the topic, or scope, of the report.
| Setting | Description |
|---|---|
| Component Expression | Here the report’s components are selected. The
expression is a class name, or a series of related classes joined with periods.
All instances of the component, or components, in this field will be part of
the report output. In the case of the sample report used in this chapter, all
nozzles and all pipelines will have an entry in the report output, regardless
of connectivity.
The right mouse button in the Component Expression field, displays an Open Helper pop up. Clicking on Open Helper opens the Report Component Expression Helper. You are encouraged to use the
Report Component Expression Helper
dialog to define a Component Expression. This helper can prevent typographical
errors and does not allow for the selection of non-related components.
|
| Selection Criteria | Allows for an additional expression to be set, for
filtering report output. The expression uses the
Infix Language (see "Infix Expression
Syntax") and may reference any attributes of the
selected components. The
Selection Criteria used in the report
created filters the report to only include the condenser
equipment class. You can open a
Component Express Helper to assist in
writing expressions for selection criteria.
The right mouse button, displays an Open Helper pop up. Clicking on Open Helper opens the Report Expression Helper. For Helper with a relationship. entries to take affect, you must click the Accept button. |
| Contained in | The Contained in Fence checkbox allows you to toggle the report to be used for fenced selections. |

Column Specification
Column Specification is where you define the content and form of columns (fields) in the report. This pane is also where sort, total, and filter criteria are entered.
| Setting | Description |
|---|---|
| Label | This is the column header (label) in this field. The columns are presented in the order they are defined in the scroll list. |
| Expression | This is the
PlantWise model data, or manipulation
of model data, that you are requesting. The expression is written in
Infix form (see
Appendix C - Infix Expression Syntax). And
Appendix E - Report Attributes defines the allowable
PlantWise attributes.
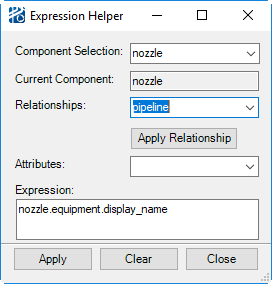
The Expression Helper is also available for forming references to component attributes and has a larger input field to simplify writing expressions. Select . For expressions written in the helper to be included in the report form, you must click on the Accept button. You can implement relationships in the column expression as well as in the component expression. The key difference is that a relationship in the column expression lists only the first instance of the class that is not a member of the component expression.  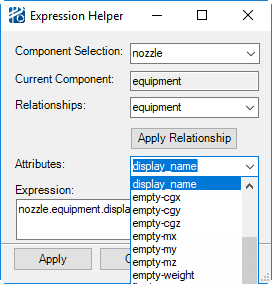
Left: Report Expression Helper showing an expression for Selection Criteria; and Right: for a Column Specification – this example contains a component, a relationship, and an attributeIf the Component Expression for the sample report being used in this chapter was set only to pipeline, you could relate nozzles to pipelines in the Column Specification, but only the nozzles connected to pipelines (rather than all nozzles) would be included in the report output. |
| Width |
Defines the width of the column in this field as
character positions. If the data does not fit into the field, it is handled as
follows:
An over-size number is presented as an asterisk (*) string An over-long string is truncated |
| Align | Select the proper data justification in the field
using this combo box.
The options are: left, center, right, and none. |
| Type |
Defines the datatype. The available data types are: integer, real, length, dimensioned, string, currency, and text.
|
| Sort, Total, and Filter |
These fields control the format of the report as discussed in Editing a Report section. |
| Accept Attribute | Once the input is completed for one column, the column is accepted as the last entry in the column definition scroll list by clicking the Accept Attribute button. |